For all the TDS Deductions of the deductees made by the company/deductor challans are submitted. These challan and deductee details form the building blocks for the preparation of the return and are entered over here.
Adding a Challan
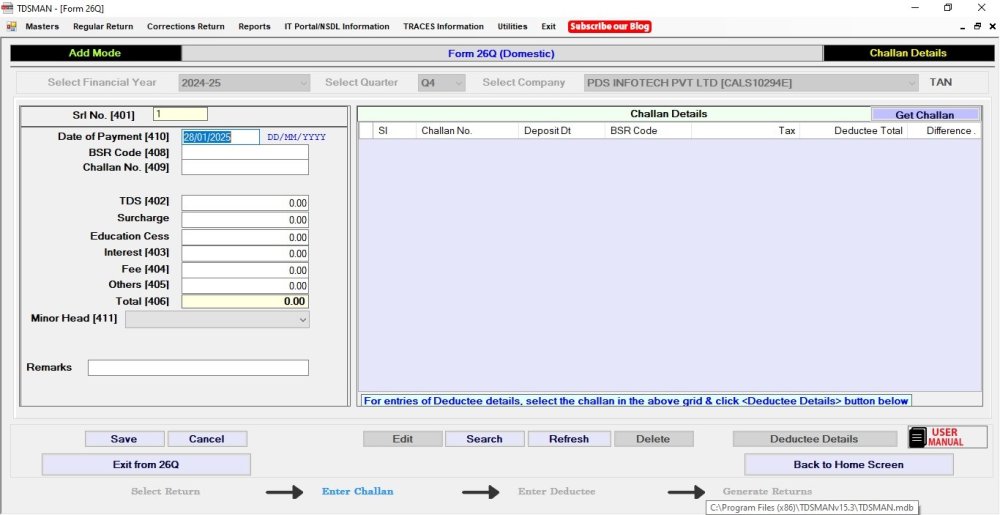
Click on the ‘Challan and Deductee Entry’ button provided at in above screen, refer to figure Return Specific Details. On clicking this button, the following screen will be displayed:
In this section we concentrate on entering and maintaining all the Challans, which have been submitted.
The above screen is divided into three sections:
i. The left panel is the area where data has to be entered
ii. The right panel displays records that has been entered
iii. The bottom part has the self labeled action buttons
The challan details screen consists of the following fields :
Srl No. :This is an auto generated sequential number.
Date of Payment :Enter the date on which Challan was submitted.
BSR Code :Enter the BSR code of the Bank.
Challan No. :Enter the Challan No.
TDS :Enter the TDS Value.
Surcharge :Enter the surcharge value.
Education Cess :Enter Education Cess.
Interest :Enter the interest value.
Fee :Enter the Fee value (paid for late submission of the return).
Others : Enter other value, if any.
Total : The total value will get calculated and displayed automatically.
Minor Head :Select the appropriate Minor Head as mentioned in Challan.
Remarks : Enter remarks.
The above details will get recorded on clicking the ‘Save’ button.
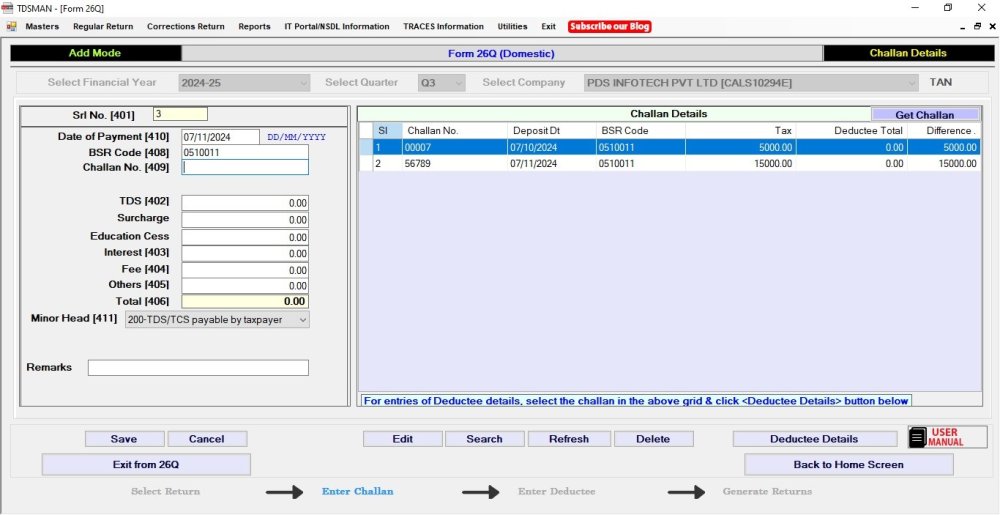
The saved entry will be displayed on the right panel. As you save more entries, the records get displayed on the right panel. An illustrative screen of two saved challans is displayed as below:
Modify a Challan
In order to modify a challan, select the challan, you need to modify, from the right panel with the help of the mouse. Either double click on this entry or click on the ‘Edit’ button. The left panel will display details of the selected entry, which can now be modified and saved again.
Note: When a challan details is shown in modify mode, you will be able to see two additional fields viz. ‘Interest (Allocated)’ and ‘Others (Allocated). By default the amount entered in interest and others fields are copied to allocated fields as well. The default values can be changed in this modify mode.Delete a Challan
In order to delete a challan, select the challan you need to delete, from the right panel with the help of the mouse. After selecting the record click on ‘Delete’ button, then after seeking your confirmation the selected record will be deleted.
Note: Whenever a challan is deleted, then all the deductees present in that challan will also subsequently get deleted.
Add Deductee Details : To add the deductee against any Challan, select the particular Challan from the grid and click on 
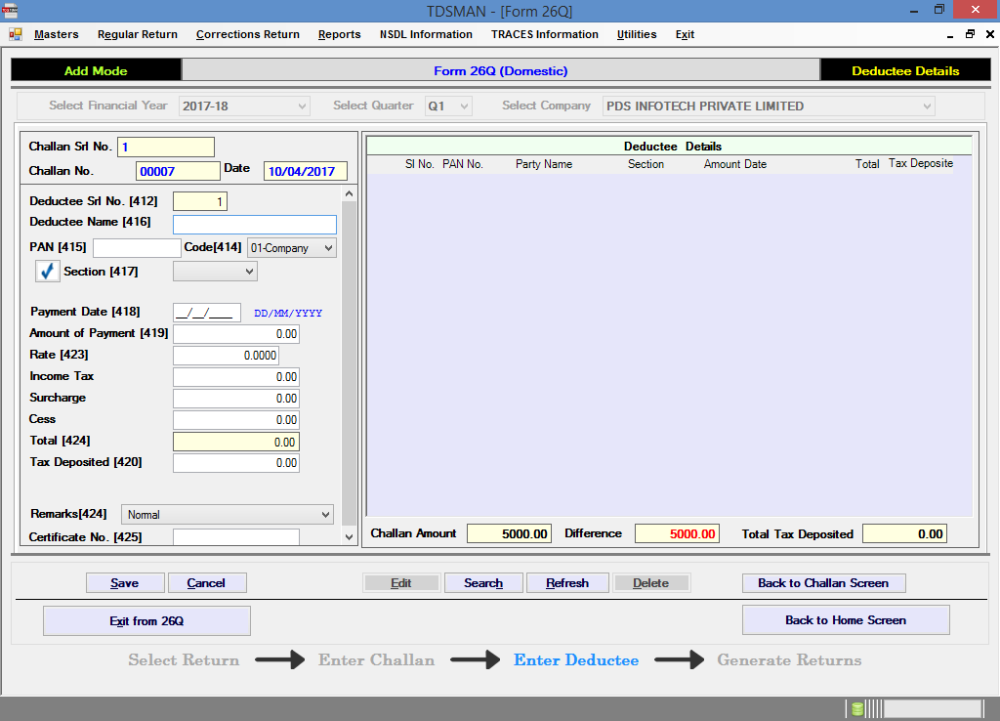 Figure 5-6 Add Deductee
The above screen is divided into three sections:
- The left panel is the area where data has to be entered
- The right panel displays records as you keep on entering
- The bottom part has the self labeled action buttons
The challan details screen consists of the following fields:
Deductee Serial No. : This is an auto generated sequential number.
Deductee Name : Enter the name of the deductee.
PAN : Enter the PAN of the deductee.
Code : Select the deductee code from the dropdown list provided.
Section : Select the section under which TDS deduction for the record was done.
Payment Date : Enter the date on which the payment was made.
Amount of Payment : Enter the amount paid.
Rate : Enter the rate of TDS.
Income Tax : Enter the Income Tax deducted.
Surcharge : Enter Surcharge.
Cess : Enter Cess.
Total : The total deduction will automatically get populated here.
Remarks : Select the relevant non deduction remark
Certificate No. : Enter the certificate number if any non deduction or lower deduction remark is selected.
Click on the ‘Save’ button to record entered details.
The saved entry will be displayed on the right panel. As you keep on making more entries, keep saving each record and list of all the records will get displayed on the right panel. An illustrative screen is displayed as below:
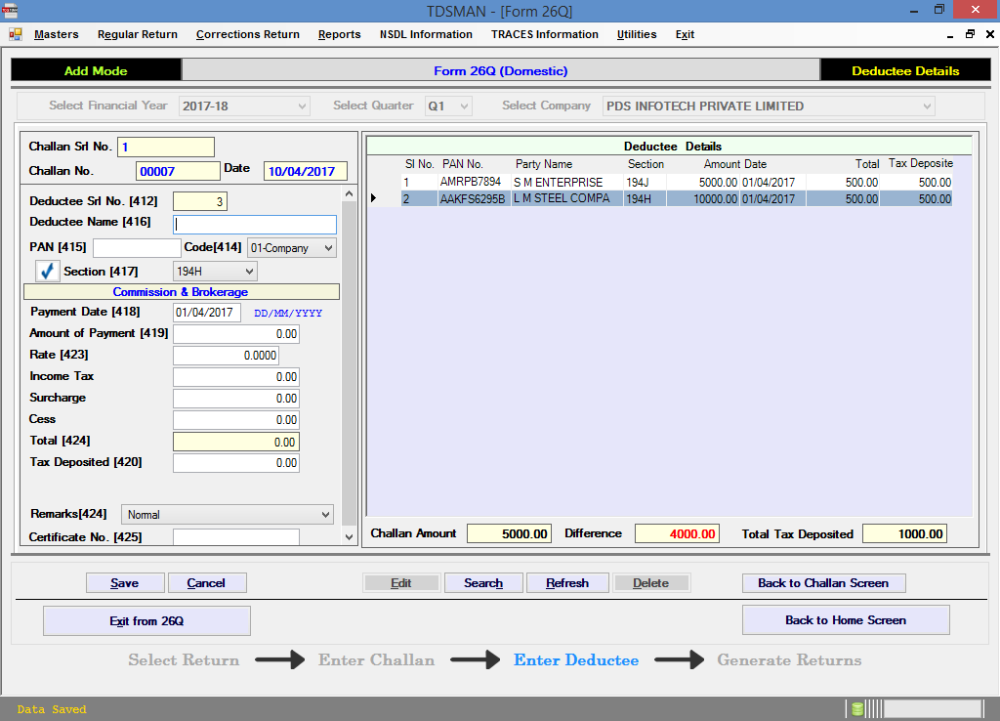 Figure 5-7 Deductee Details
Deductee Master Help
While entering the deductee name, the software will provide a help screen having list of deductees matching with the value entered in the field. One can select the deductee from the help screen to populate the details in the required fields. Moreover, when a new deductee record is entered its master will automatically get created when the record is saved.
Modify a Deductee
In order to modify a deductee, select the deductee you need to modify, from the right panel with the help of the mouse. Either double click on this entry or click on the ‘Edit’ button. The selected entry will be displayed on the left panel which can now be modified and saved again.
Note: When a deductee details is shown in modify mode, you will be able to see an additional fields viz. ‘Deducted Date’. By default the date entered in payment date field is copied to deducted date field as well. The default values can be changed in this modify mode.Delete a Deductee
In order to delete a deductee, select the deductee you need to delete, from the right panel with the help of the mouse. After selecting the record click on ‘Delete’ button, then after seeking your reconfirmation the record will be deleted.
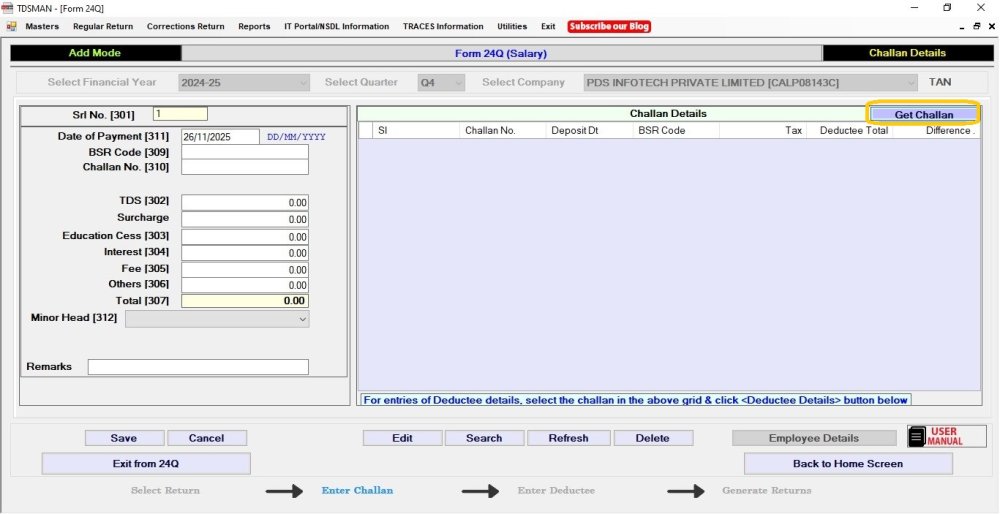
Get Challan :
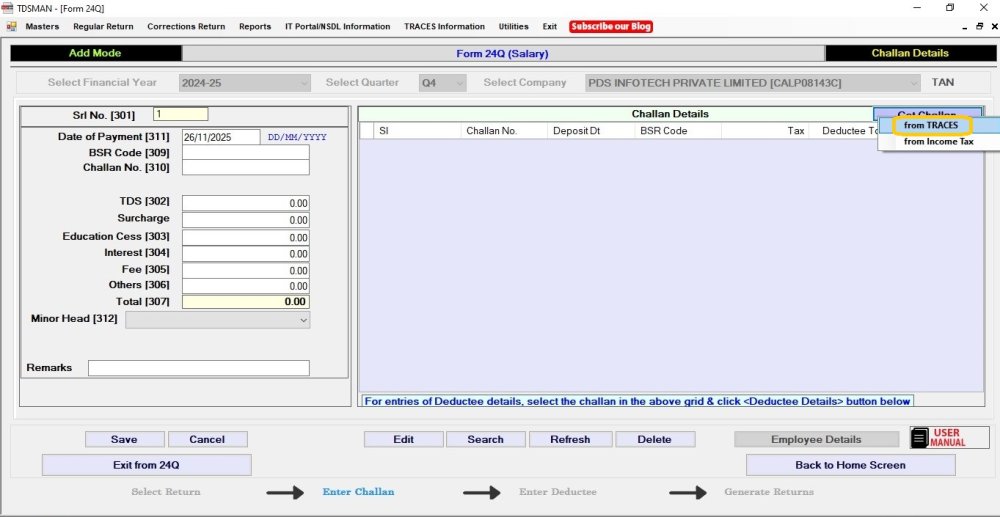
While preparing Regular Return, the challan(s) can be fetched from either Traces or Income Tax.The system gives the option of fetching the challans directly from the government website. In order to do so, click on ‘Get Challan’, as shown below.
- To fetch it from TRACES the user has to be provide the challan amount which will be validated with the actual amount and fetched. click on ‘From Traces’ button after clicking on ‘Get Challan’ on ‘Challan & Employee Entry’ page :
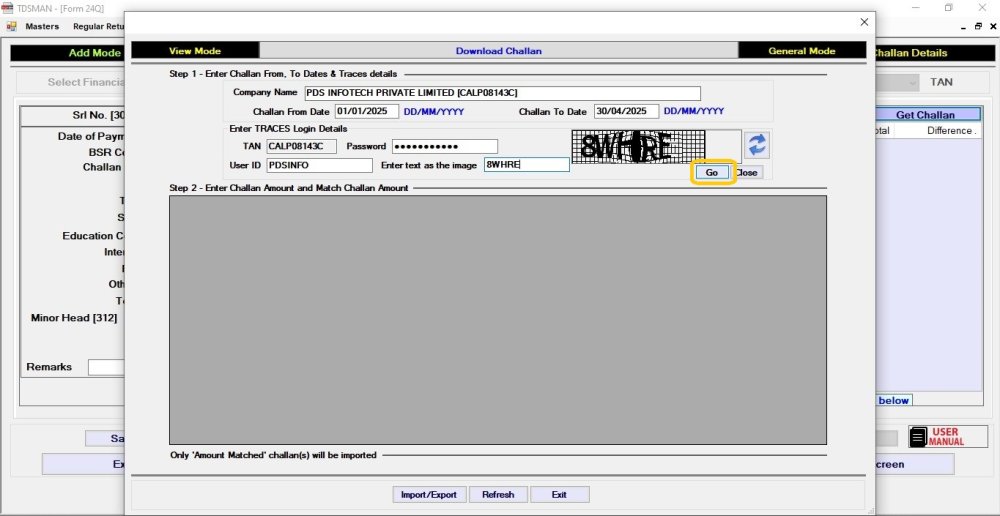
Enter the Date Range i.e. the From Date and the To Date, for which the challans have to be extracted. Once the credentials of TRACES is validated, click on ‘Go’ , the process commences and the extracted challans can be viewed in the interface below:
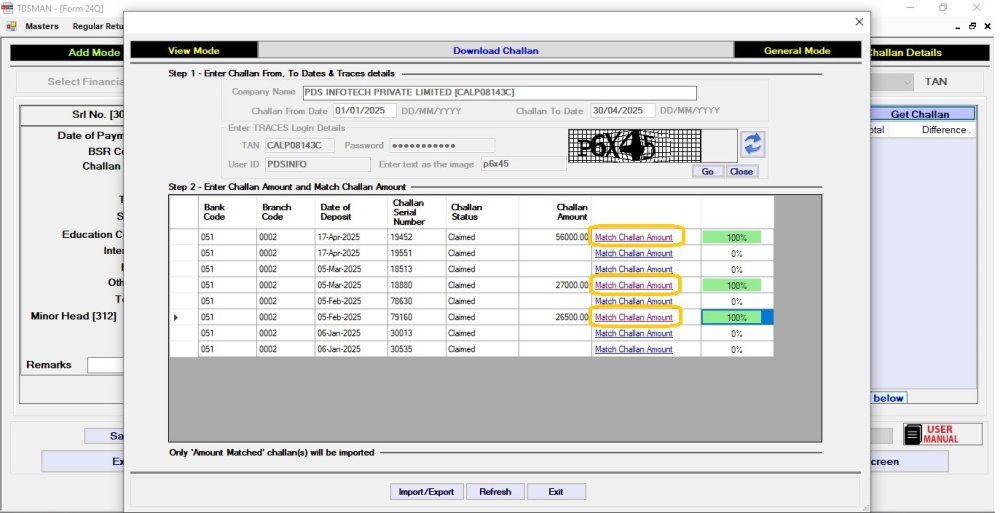
The User needs to enter the challan amount against the respective challan and click on ‘Match Challan Amount’ to ensure that this amount matches with the amount recorded with the government. Once it reaches 100% the challan is matched.
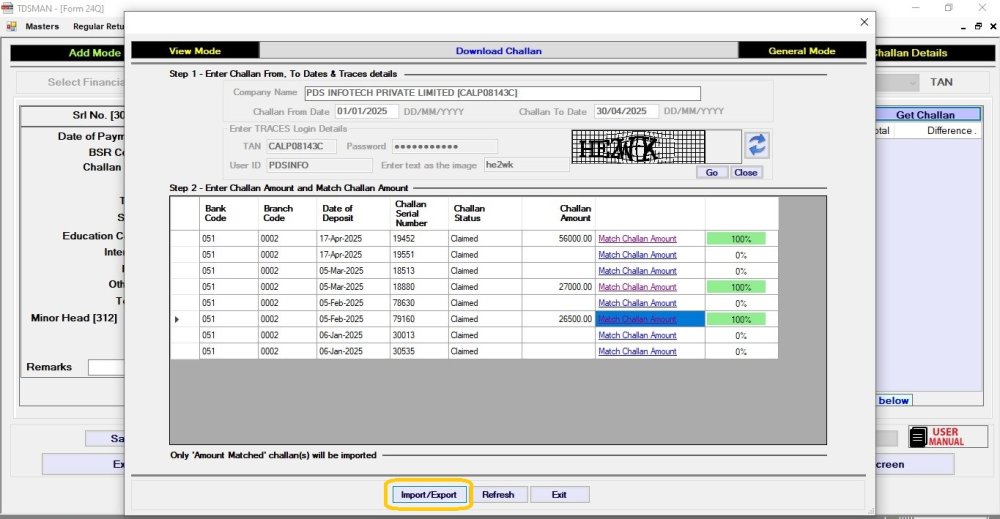
Once all your challan matched , either you can Import the challans directly into TDSMAN or you can export the data as Excel or CSV format
In order to do so, you have click on ‘Import/Export’ :
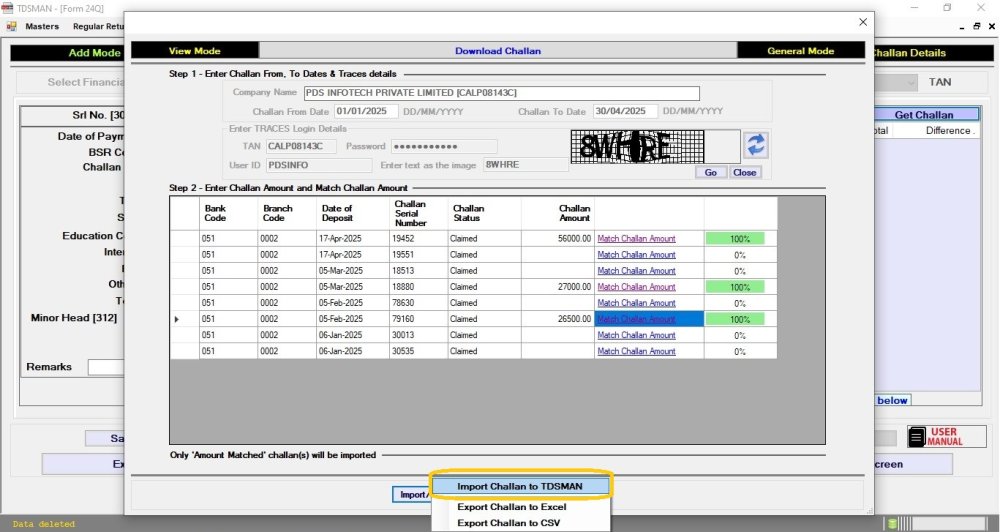
In order to import the challans you matched to TDSMAN software directly click on ‘Import Challan to TDSMAN’ :
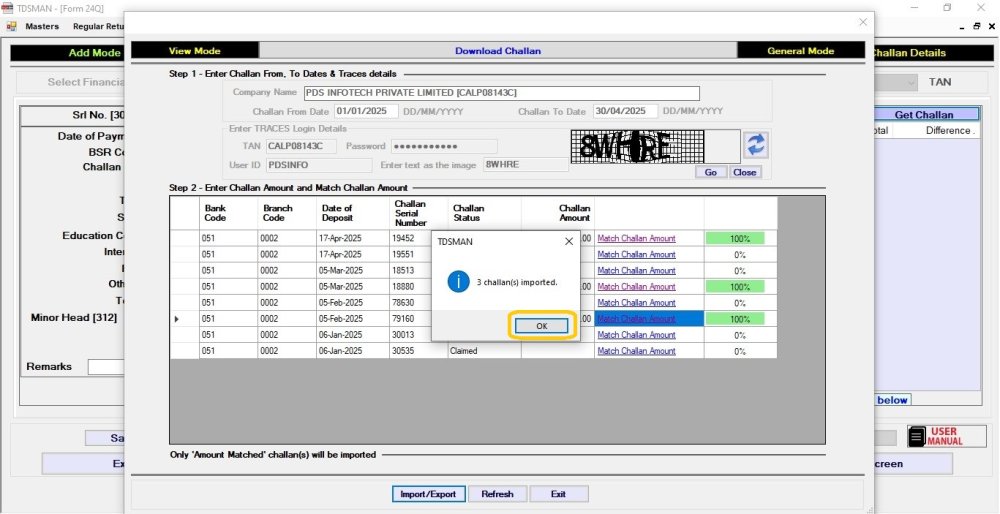
Once the challans got imported in TDSMAN successfully , following screen will come, Click on ‘ok’ :
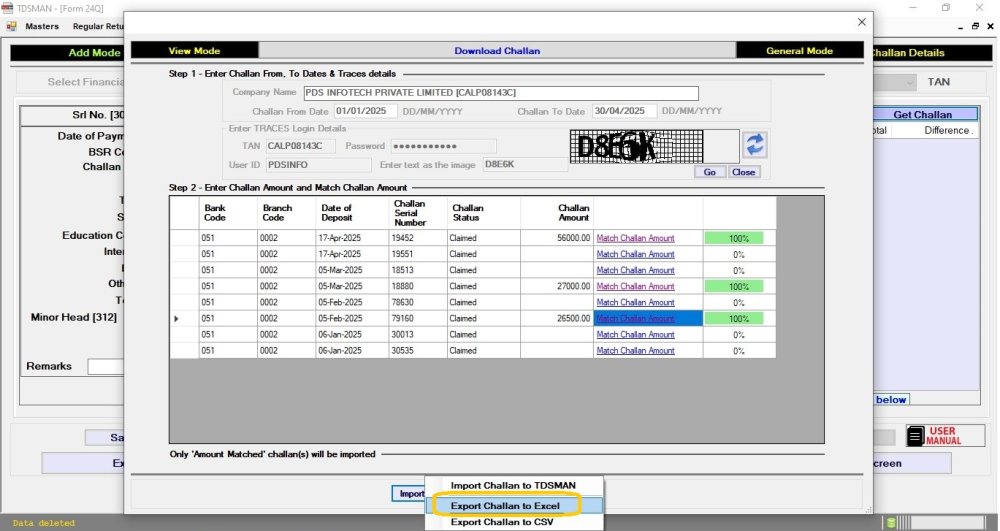
In order to Export the challans you matched to Excel format click on ‘Export Challan to EXCEL’ as shown below:
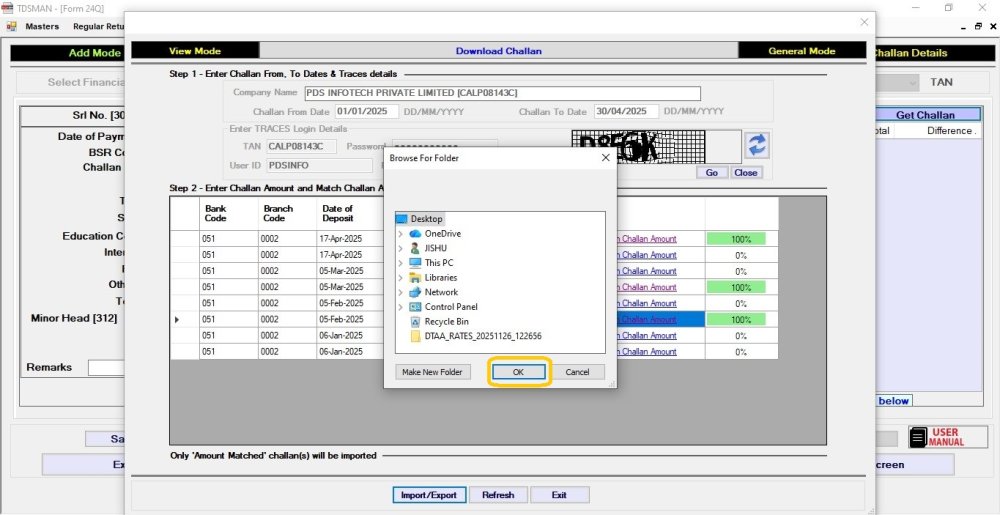
Then select the path where you want to save the excel file , and click on ‘OK’ :
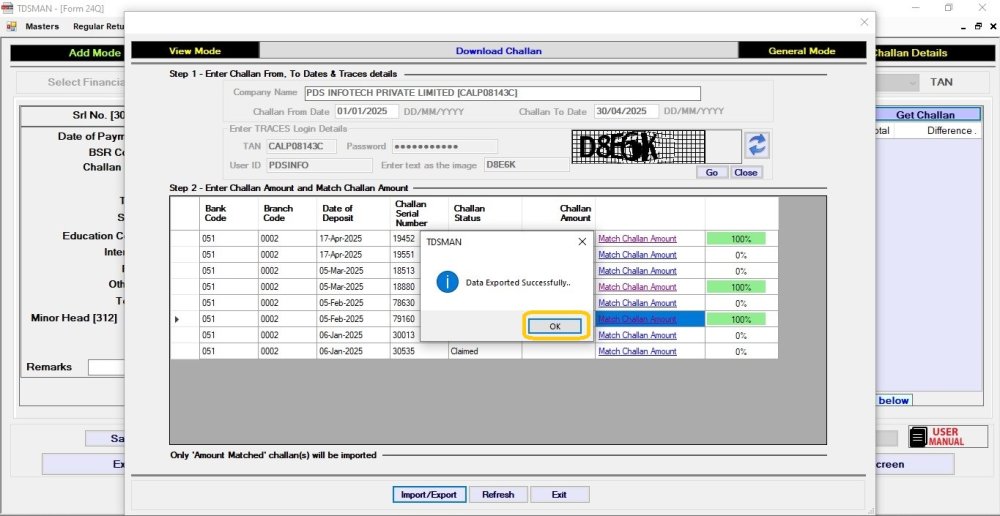
Once the excel exported successfully , Click on ‘Ok’ :
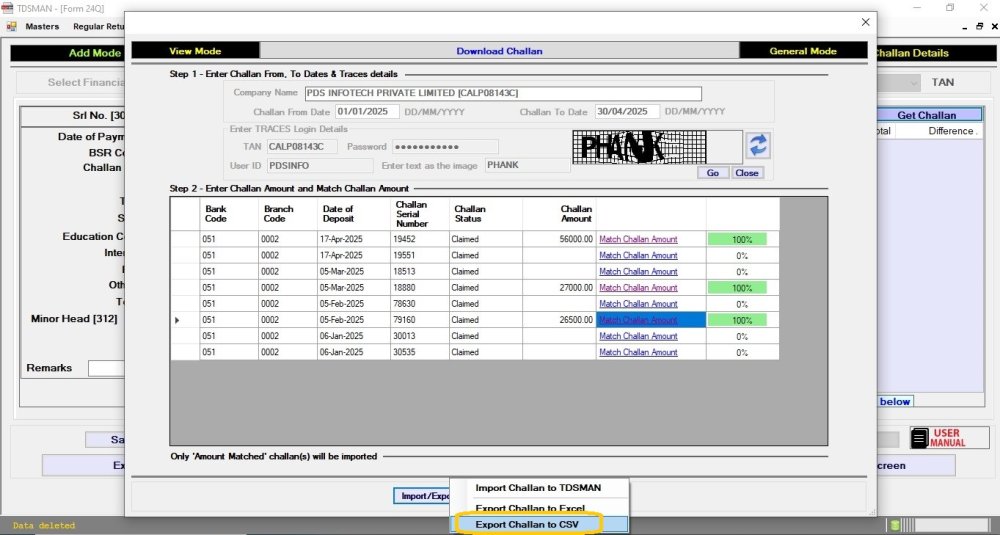
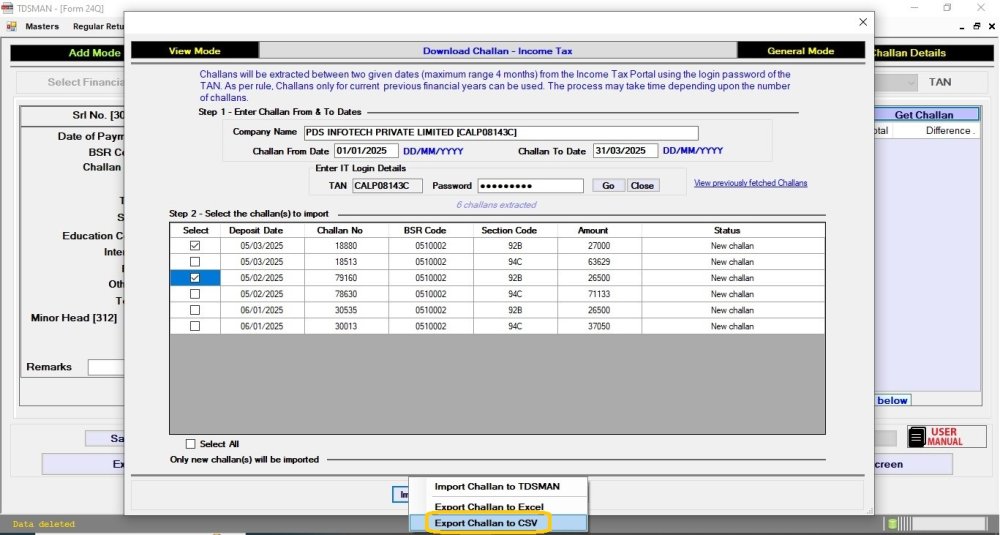
In order to Export the challans you matched to CSV format click on ‘Export Challan to CSV’ as shown below:
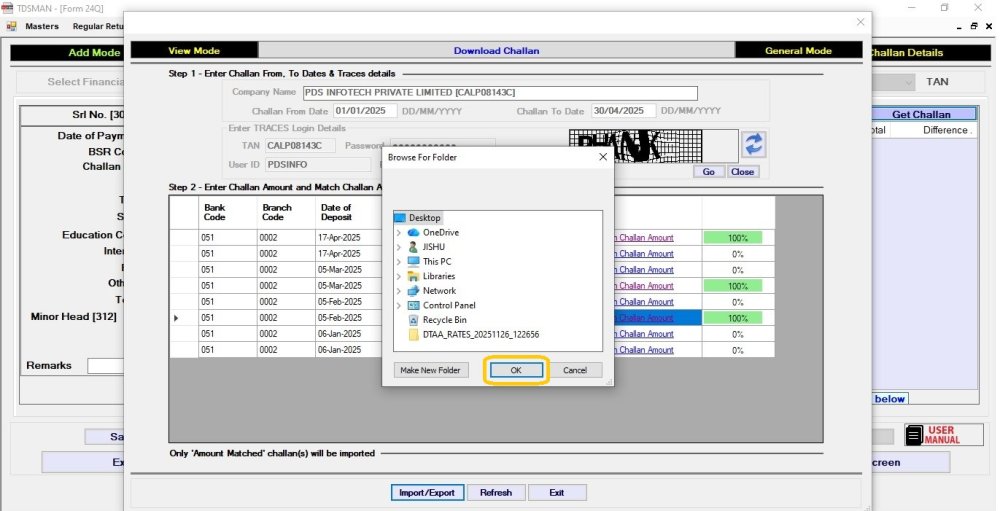
Then select the path where you want to save the CSV file , and click on ‘OK’ :
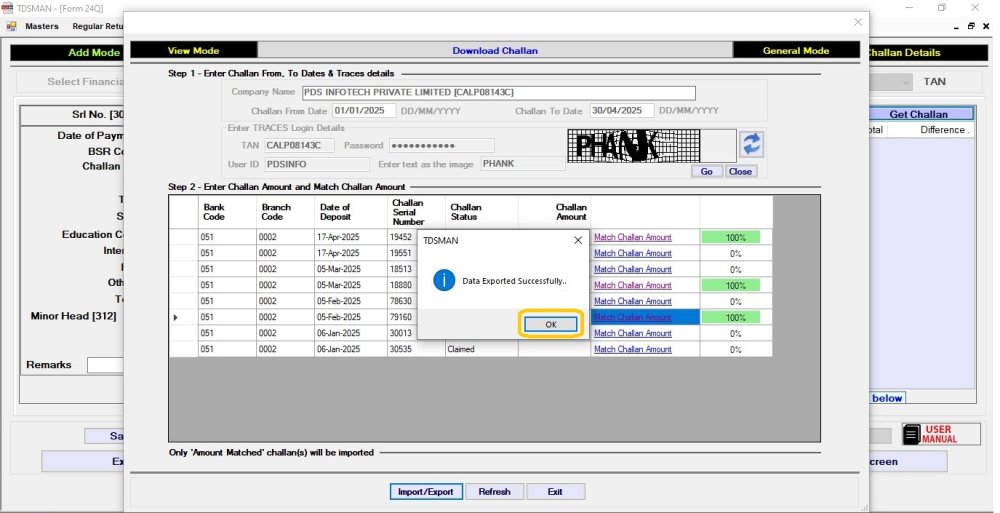
Once the CSV exported successfully , Click on ‘Ok’ :
Get Challan from Income tax
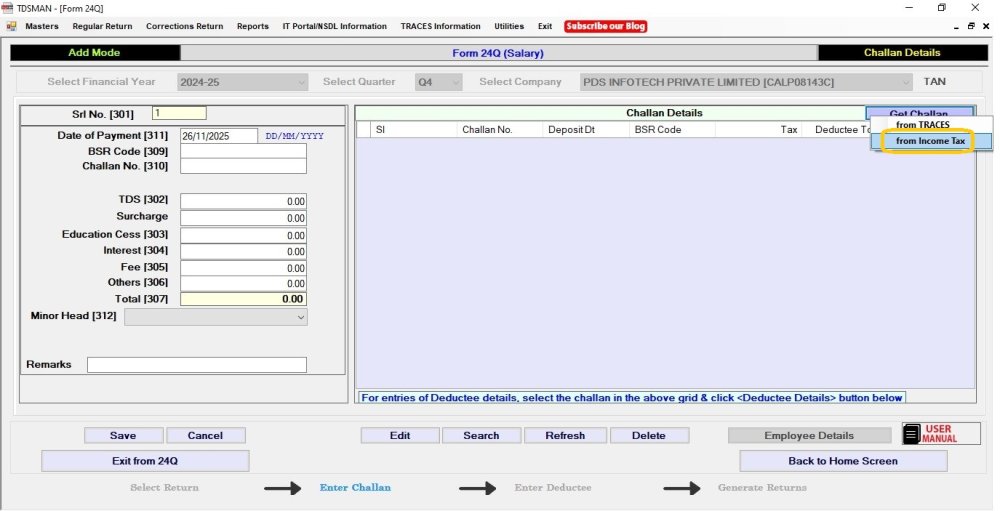
In order to fetch challans from the Income Tax Portal, click on ‘from Income Tax’ under *‘Get Challan’ as shown below:
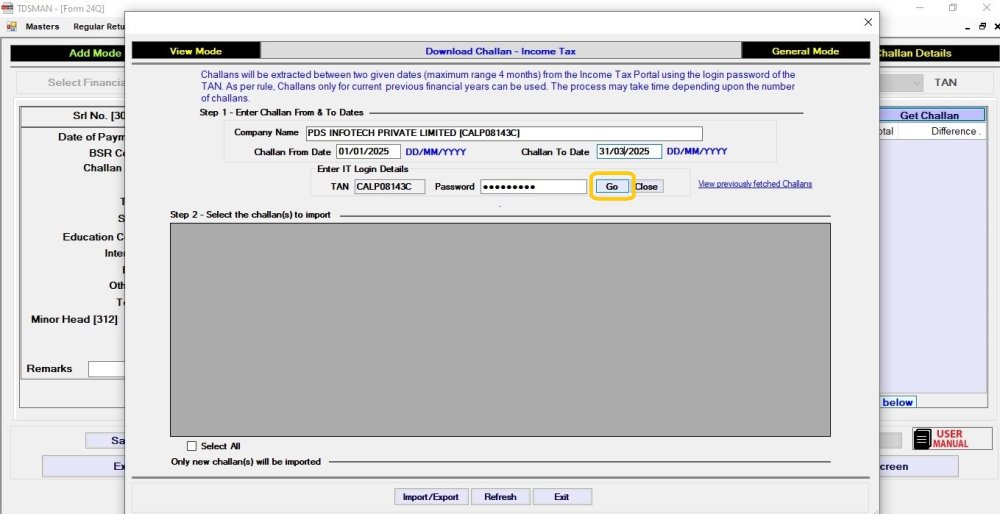
The Income Tax Portal Credentials have to be entered. TAN is the Income Tax User Id.
Provide From Date and To Date. This date range can be for a maximum period of 4 months. Further, as per rules the challans can be extracted only for the current and previous financial year.
In order to get the challan click on ‘Go’
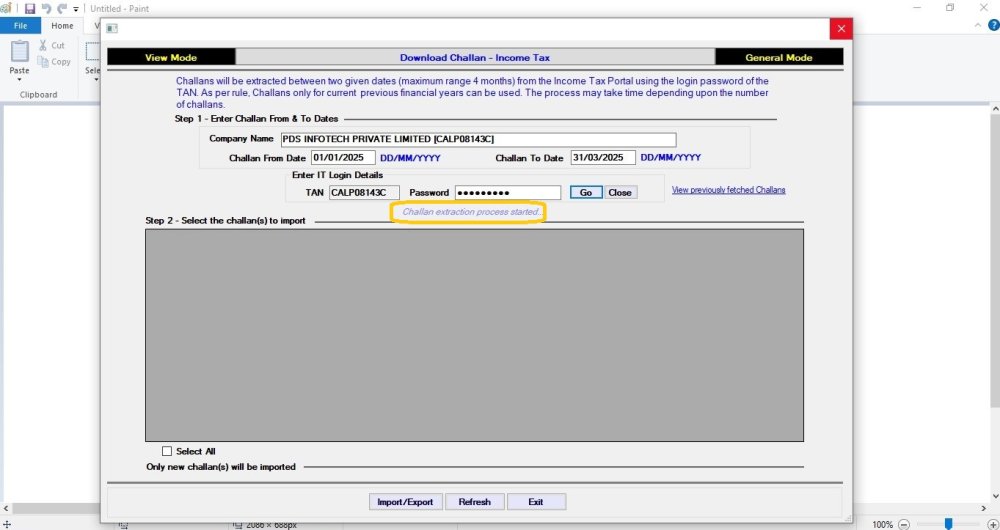
The extraction process may take time depending upon the number of Challans.
Progress will be displayed as extraction takes place.
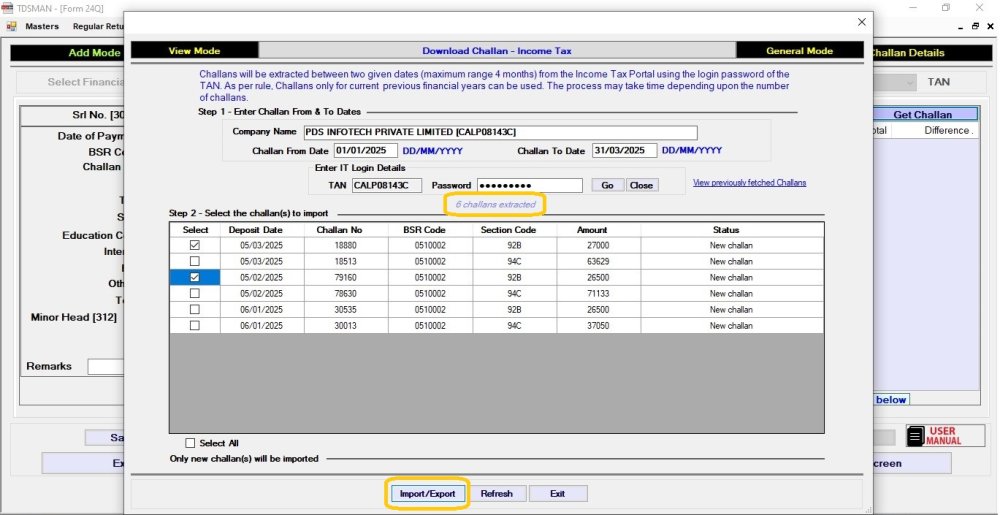
All the challans within the given date range will get extracted and displayed, as shown below.
In order to Import/Export the challans, select the relevant challans.
Click on ‘Import/Export’, as shown below
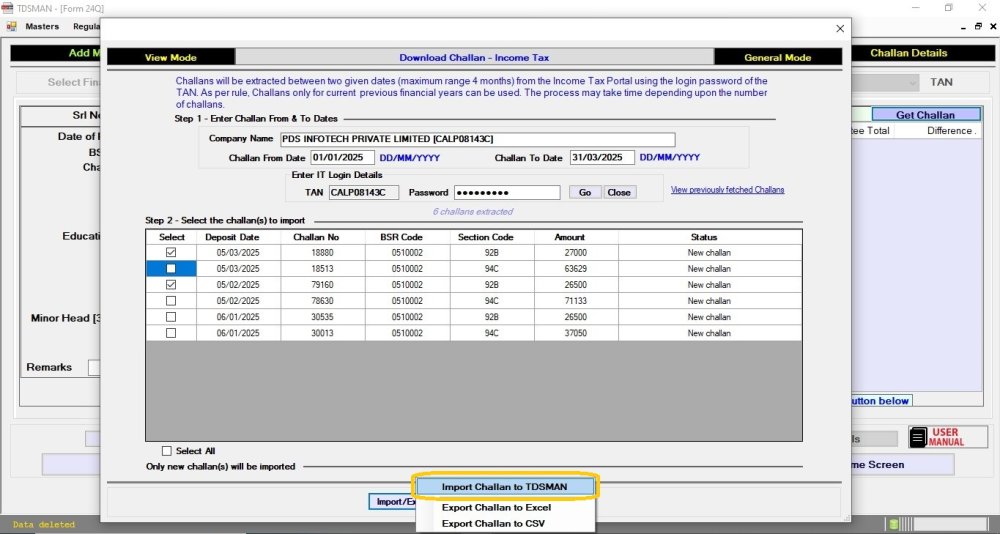
In order to import the challans to TDSMAN software directly click on ‘Import Challan to TDSMAN’ :
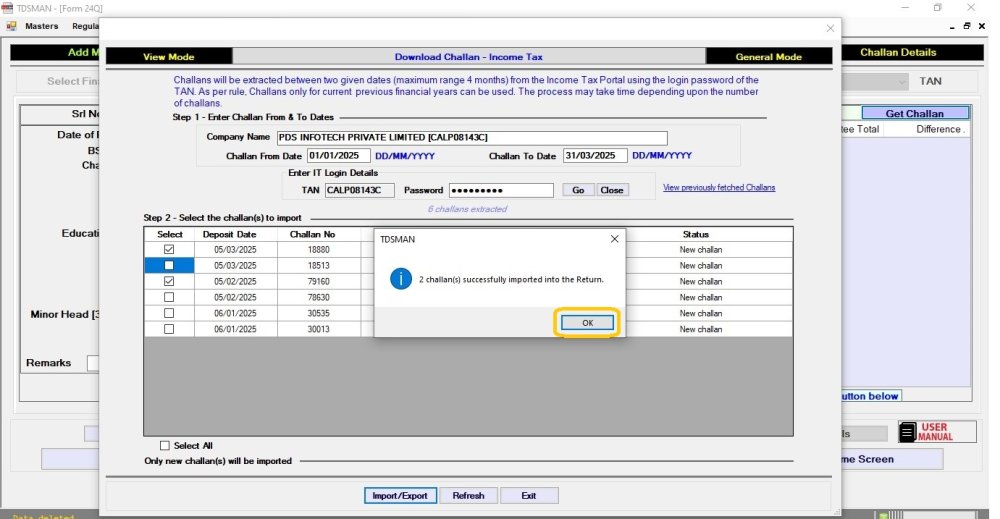
Once the challans got imported in TDSMAN successfully , following screen will come, Click on ‘ok’ :
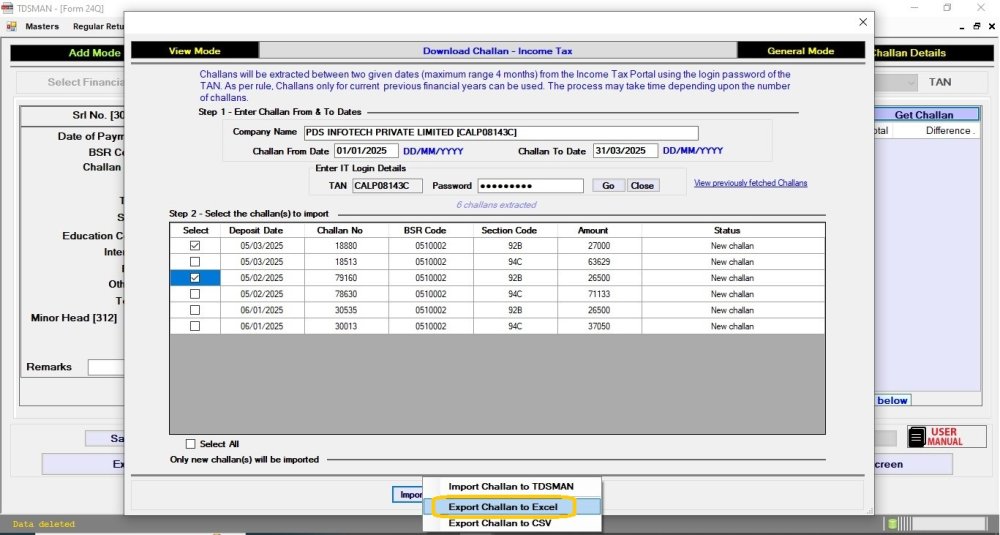
In order to Export the challans to Excel format click on ‘Export Challan to EXCEL’ as shown below:
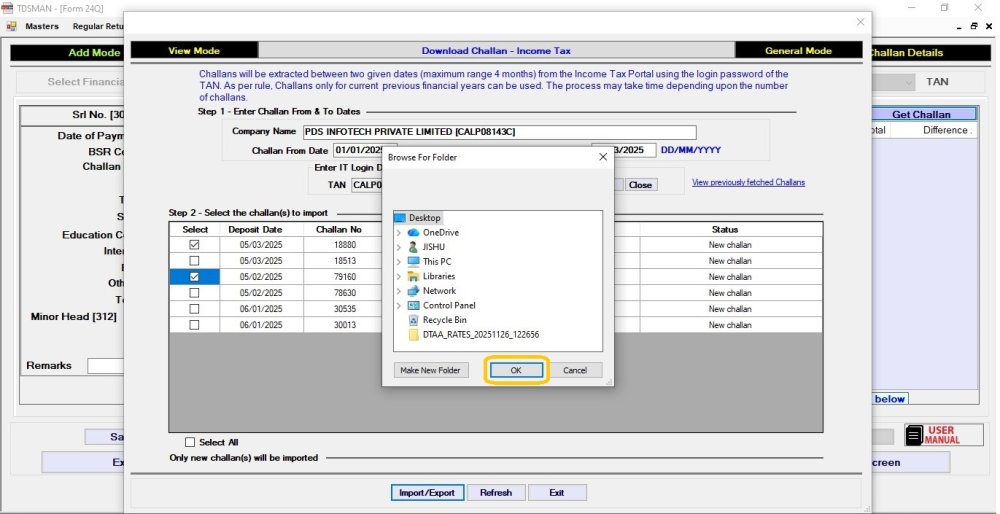
Then select the path where you want to save the excel file , and click on ‘OK’ :
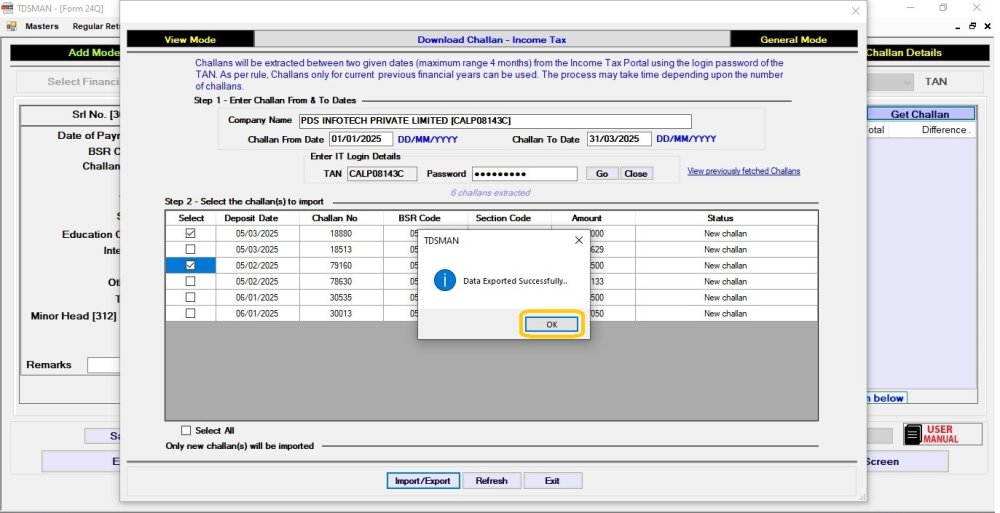
Once the excel exported successfully , Click on ‘Ok’ :
In order to Export the challans to CSV format click on ‘Export Challan to CSV’ as shown below:
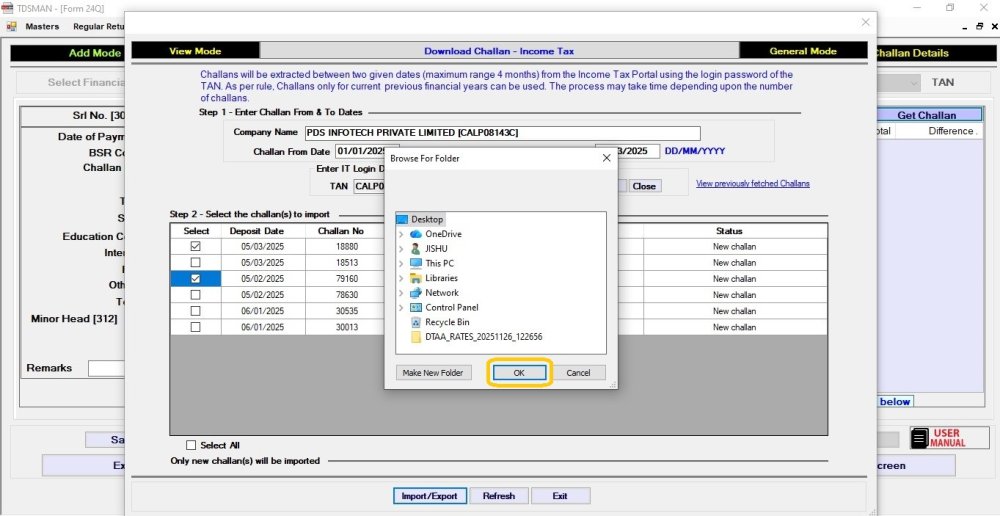
Then select the path where you want to save the CSV file , and click on ‘OK’ :
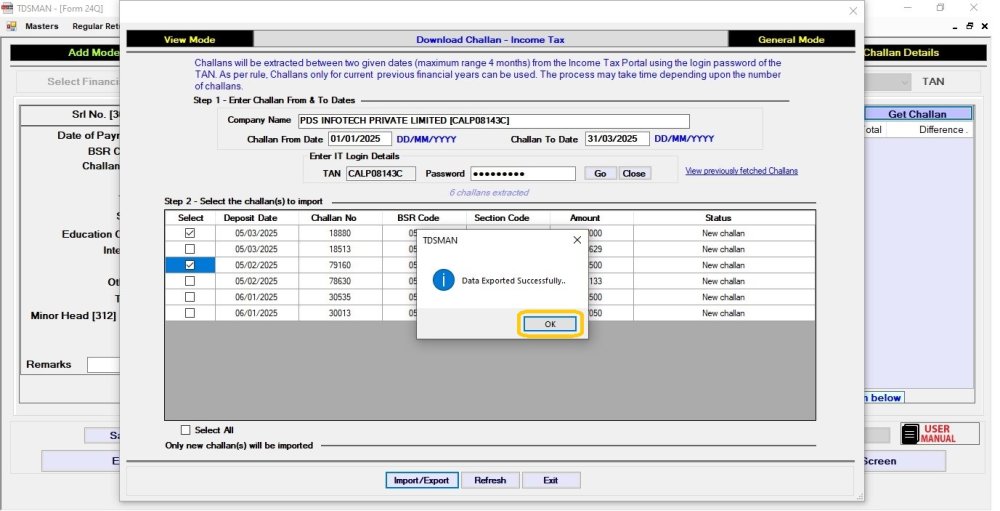
Once the CSV exported successfully , Click on ‘Ok’ :
Need more help with this?
TDSMAN - Support


