
To import data from Excel/CSV for Salary Details, follow the steps given below:
- Create a Blank Excel/CSV sheet
- Enter data in the sheet
- Validate and import data from the Excel/CSV sheet
The specified actions can be accomplished through either of the two available options, 1. Excel or 2. CSV both of which are explained below:
Create a Blank Excel Sheet
A pre-defined format has been provided in the Regular Return Menu. In order to do this, click on Regular Return > Import from Excel/CSV > Create Blank Excel Sheet :
The following screen will appear:
Select the Financial Year. Import Type (Form 138 (24Q) – Salary Details) and the relevant file type i.e. xls or xlsx files. Select the Excel File Path to Save the same in the selected destination folder.
Enter data in the created Excel sheet
Provide the Challan and Salary details in the Excel workbook as per displayed in the columns headers.
Note: Guidelines for placement of data are provided within the Excel workbook and should be strictly followed.
Validate and Import data from Excel:
To import the data from Excel sheet, click on the option ‘Import from Excel/CSV’ > ‘Import Transactions’ > Excel
The following screen will appear:

Select the Financial Year, Quarter, Form No. and the Company Name for which the data needs to be imported. Select the Excel file and choose the relevant ‘Import Type’ applicable. Click on ‘Validate Excel File’ to proceed with the data validation in Excel file. In case of errors encountered, it will be listed out in one of the worksheets of the Excel file. Further, if ‘Color Coding for Errors’ has been opted for, errors will also be marked in ‘color’ in the relevant data cells.
One needs to make corrections in the Excel sheet and again ‘Validate’ in a similar manner.
Once, the validation is successful (with no errors), the data is displayed in the format as under:

Pan Verify before Data Import :
It is advisable to verify the PAN before proceeding further. The user can click on ‘Verify All PAN’ or ‘Verify New PAN’ as per requirement. The following screen will get displayed:

The relevant PAN with the Deductee Names, as entered in the system, will get displayed. Click on ‘Start Validation’ .

Once the credentials of TRACES are validated, click on ‘Go’. The process commences and all the Deductee Names as recorded with the government, for the respective PAN will be displayed in the interface below:

The ones in brown indicates name mismatch, and the records in yellow are inoperative . And if there is any record in red, it would indicate that the PAN given is wrong
All data as in the Excel file can be viewed in the interface above. The data can be browsed through the content to ensure that data is being displayed. Once satisfied, click on ‘Import Data’ to transfer it into the software database.
Note: The data gets transferred into the system only after ‘Import Data’ is clicked upon and confirmed subsequently. After the import is completed you can go to the respective Form where the data was imported and you are ready to generate the file for return submission.
Create Blank CSV Format :
Go to Regular Return > Import from Excel/CSV > Create Blank Excel Sheet :
![]()
The following screen will get displayed:
![]()
Select the Financial Year and Selected Import Type will be Form 138 (24Q) Salary Details. Select the Path to Save the same in the selected destination folder.
Enter data in the created CSV file
Provide the salary details in the respective CSV files as displayed in the column headers.
Note: Guidelines for placement of data are provided within the CSV files and should be strictly followed.
Validate and Import data from CSV
Go to Regular Return > Import from Excel/CSV > Import Transactions > CSV
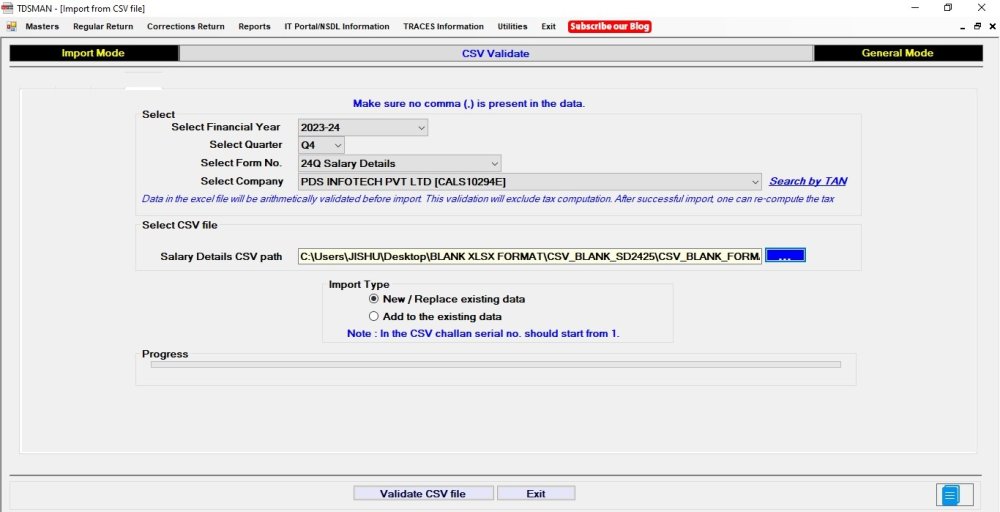
On the same interface as above, select the CSV formats in Challan and Deductee file path section and choose the relevant ‘Import Type’ applicable. Click on ‘Validate CSV File to proceed with the data validation as provided in the CSV formats. In case of errors encountered, it will be listed out in a HTML file.
One needs to make corrections in the CSV and again ‘Validate’ in a similar manner.
Once, the validation is successful (with no errors), the data is displayed in the format as under:

Pan Verify before Data Import :
It is advisable to verify the PAN before proceeding further. The user can click on ‘Verify All PAN’ or ‘Verify New PAN’ as per requirement. The following screen will get displayed :

The relevant PAN with the Deductee Names, as entered in the system, will get displayed. Click on ‘Start Validation’ .

Once the credentials of TRACES are validated, click on ‘Go’ . The process commences and all the Deductee Names as recorded with the government, for the respective PAN will be displayed in the interface below:

The ones in brown indicates name mismatch, and the records in yellow are inoperative . And if there is any record in red, it would indicate that the PAN given is wrong
All data as in the CSV file can be viewed in the interface above. One can browse through the content to ensure that data is being displayed. Once satisfied, click on  to transfer it into the software database.
Need more help with this?
TDSMAN - Support