
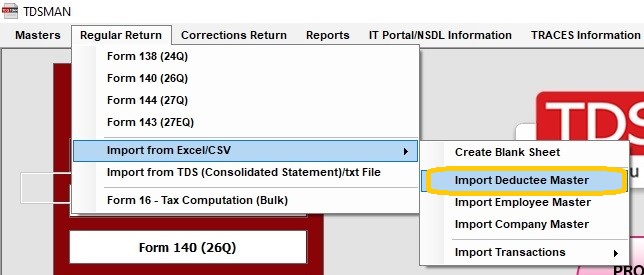
Import Deductee Master
Apart from the manual creation of the Deductee, it can also be imported into the system through Excel and get added to the list already present. This would save effort in entering data through formats of the software interface.
Importing data from Excel can be done in 3 steps:
1 Download the pre-defined blank Excel format in the desired location
2 Prepare the required data in this Excel sheet
3 Upload this data from the Excel sheet into the system
1. In order to import the data from Excel, first download the pre defined blank Excel format in the desired location.
Click on Regular Return > Import From Excel > Create Blank Excel Sheet :
The following screen will appear:
Financial Year: Select the Financial Year of the Return for which the Deductee Master has to be entered.
Select Import Type: Select Deductee Master, as the blank Excel sheet with pre-defined format for Deductee Master is required.
Excel File Path : Enter the desired location to save the blank Excel format.
Save : Save the Excel format in a desired location by clicking on ‘Save’
2. Prepare the Deductee data in the pre-defined blank Excel sheet, make sure about the following:
i. Only unique PAN should be provided in the list (there should be no duplicates)
ii. For Deductee without PAN – ‘Name’ should be unique (no duplicates)
3. In order to import the deductee data, click on Regular Return > Import From Excel > Import Deductee Master :
The following screen will appear :

Enter the path of the source Excel file path for import of data.
Update Name & Address of existing Deductees: For a PAN already existing, the system gives the option to update the name and other information as per the data provided in Excel. In case, it needs to be done, check the box.
Color coding in Excel for error (this may take a few more minutes) :If there is any error in the data provided in the Excel sheet, the system will highlight the same. The user is expected to rectify the data and import the entire file again. In order to display these errors using the color code, check this box.
Validate Excel File : Click on  to validate the data in the source Excel file.
Once the data is validated and if the data provided is correct, the system displays the following screen:

Click on  , the data will get imported into the system.
However, if there is any error in the data, the system will highlight the errors. The errors have to be rectified and the Excel sheet has to be imported again.
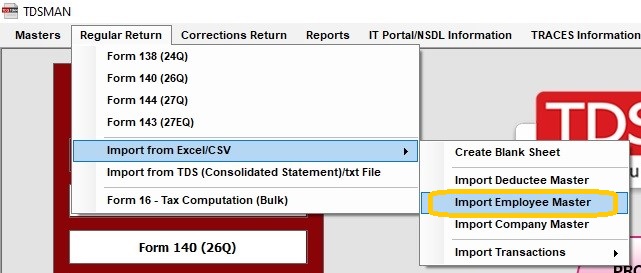
Import Employee Master
Apart from the manual creation of the Employee, it can also be imported into the system through Excel and get added to the list already present. This would save effort in entering data through formats of the software interface.
Importing data from Excel can be done in 3 steps:
1 Download the pre-defined blank Excel format in the desired location
2 Prepare the required data in this Excel sheet
3 Upload this data from the Excel sheet into the system
1. In order to import the data from Excel, first download the pre-defined blank Excel format in the desired location. Click on Regular Return > Import From Excel > Create Blank Excel Sheet :-
The following screen will appear:
Financial Year: Select the Financial Year of the Return for which the Employee Master has to be entered.
Select Import Type: Select Employee Master, as the blank Excel sheet with pre-defined format for Employee Master is required.
Excel File Path: Enter the desired location to save the blank Excel format.
Save: Save the Excel format in a desired location by clicking on ‘Save’
2. Prepare the Employee data in this pre-defined blank Excel sheet, make sure about the following:
i. Only unique PAN should be provided in the list (there should be no duplicates)
ii. For Employee without PAN – ‘Name’ should be unique (no duplicates)
In order to import the Employee details, click on Regular Return > Import From Excel*> *Import Employee Master:
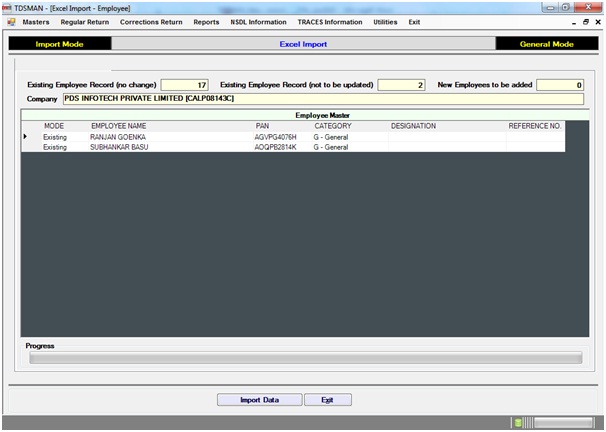
The following screen will appear:

Enter the path of the source Excel file path for import of data.
Update Category, designation & Reference no. of the existing Employees: The system gives the option to the details of the existing employees as per the data in the Excel. In order to do this, check this box.
Color coding in Excel for error (this may take a few more minutes) – If there is any error in the data provided in the Excel sheet, the system will highlight the same. The user is expected to rectify the data and import the entire file again. However, in order to display these errors using the color code, check this box.
Validate Excel File : Click on to validate the source Excel file.
Once the data is validated and if the data provided is correct, the system displays the following screen:
Click on the data will get imported into the system.
However, if there is any error in the data, the system will highlight the errors. The errors have to be rectified and the Excel sheet has to be imported again.
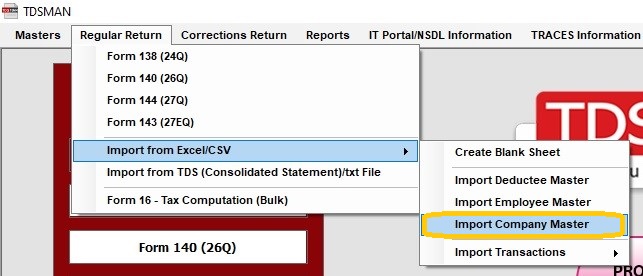
Import Company Master
Apart from the manual creation of the Company, it can also be imported into the system through Excel and get added to the list already present. This would save effort in entering data through formats of the software interface.
Importing data from Excel can be done in 3 steps:
1 Download the pre-defined blank Excel format in the desired location
2 Prepare the required data in this Excel sheet
3 Upload this data from the Excel sheet into the system
The following screen will appear :
Financial Year: Select the Financial Year of the Return for which the Company Master has to be entered.
Select Import Type: Select Company Master, as the blank Excel sheet with pre-defined format for Company Master is required.
Excel File Path : Enter the desired location to save the blank Excel format.
Save : Save the Excel format in a desired location by clicking on ‘Save’
2. Prepare the Company data in the pre-defined blank Excel sheet, make sure about the following:
i. The company name and TAN, together as a combination, has to be unique (there should be no duplicates)
3. In order to import the Company details, click on Regular Return > Import From Excel > Import Company Master :-
The following screen will appear :

Enter the path of the source Excel file path for import of data.
Color coding in Excel for error (this may take a few more minutes) – If there is any error in the data provided in the Excel sheet, the system will highlight the same. The user is expected to rectify the data and import the entire file again. However, in order to display these errors using the color code, check this box.
Validate Excel File : Click on to validate the source Excel file.
Once the data is validated and if the data provided is correct, the system displays the following screen:
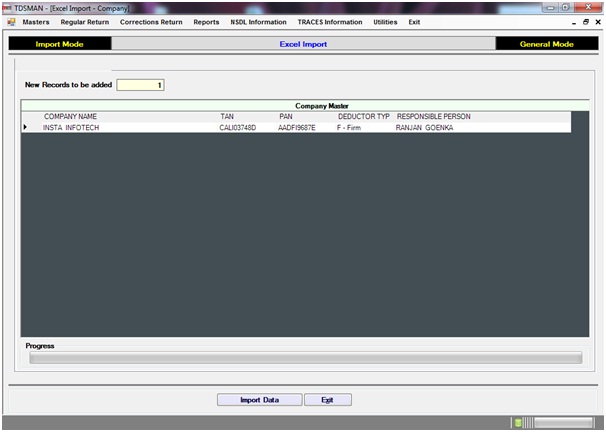
Click on The data will get imported into the system.
However, if there is any error in the data, the system will highlight the errors. The errors have to be rectified and the Excel sheet has to be imported again.
Need more help with this?
TDSMAN - Support