
Click on ‘Preferences’ option under ‘Utilities’

The images below display the ‘Preference’ options as displayed upon scrolling.

All options in the list are explained as under:
1. Enter ‘Deducted Date’ while entering the ‘Deductee Details’
In the Add mode of ‘Deductee Details’, the ‘Payment Date’ as entered is considered as the ‘Deducted Date’. As such ‘Deducted Date’ is not displayed.
To add ‘Deducted Date’ in the interface, one needs to check the box displaying “In Deductee Details interface allow the ‘Deducted Date’ to be displayed in ‘Add’ mode”.

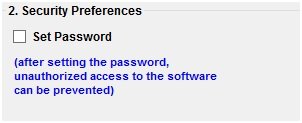
2. Ensure that the software is accessed only through a Password
In order to ensure that the software is accessed only through a password, one needs to check the box displaying ‘Set Password’ under Security Preferences. The system gives the option to enter the password that one wants to set. This password has to be confirmed by re-entering the same and click on ‘Apply’.
3. Interest amount to be automatically copied to ‘Interest Allocated’, while importing data from Excel
To automatically copy the Interest Amount to Interest Allocated, one needs to check the box displaying ”Copy ‘Interest’ amount to the ‘Interest Allocated’ during Excel Import”

4. No default pre-selected Return, when one gets into the TDSMAN system
In order to ensure that no Return is pre-selected when one enters the TDS Return Module, check in the box displaying “There should be no default pre-selection of Return while selecting any module”.

5. Enter Interest (Allocated)’ and ‘Others (Allocated)’ in ‘Challan Details’
To Add ‘Interest(Allocated)’ and ‘Others(Allocated)’ in the ‘Challan Details’ interface, one needs to check the box displaying ‘‘In ‘Challan Details’ interface allows the fields ‘Interest (Allocated)’ and ‘Others (Allocated)’ to be displayed in ‘Add’ mode”.

6. Reminder for taking data backup
By default, the box for ‘Set Backup Reminder’ is checked and the frequency is set for 7 days. This means that once 7 days have lapsed since the last backup, the system will remind you once you start the software. However, one may change the reminder frequency as per convenience.

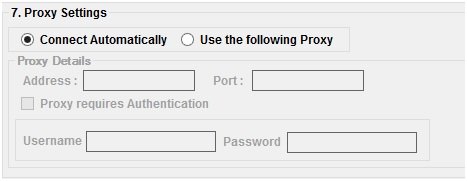
7. Setup the Proxy Settings for accessing the internet through the software
The system by default automatically connects to the available internet connection. However, if its access is through a proxy server, this needs to be defined. Check in the box displaying ‘Use the following Proxy’ under ‘Proxy Setting’. Provide the appropriate values.
8. Search a text embedded in the name while searching in the Deductee List
In order to ensure that the embedded text can be searched in the Deductee List, one needs to check the box displaying ‘Embedded Search’ under Deductee Search.

9. Import ‘Deducted Date’ while importing data through Excel
In order to import ‘Deducted Date’ through the excel format, one needs to check the box displaying ‘Enable option to import Deducted Date’.

Please note that in the excel workbook, one will need to add a column in ‘Deductee Details’ in the sheet with the header ‘Deducted Date’.
10. Traces Login
In order to log into TRACES browser module through TDSMAN interface, one needs to check the box displaying ‘Using Browser for login to Traces’.

11. Manually enter the Tax Deduction Rate while working on the TDS Return
In order to ensure that the Tax Deducted rate is not calculated automatically and is left blank so that it can be entered manually, one needs to check the box displaying “Do not populate TDS/TCS ‘Rate’ automatically in forms 26Q, 27Q, 27EQ”.

12. Default Minor Code Selection
While entering challans the selected Minor Code will be default Selected , one can select either of these two options – 200 TDS/TCS Payable by Taxpayer or 400 TDS /TCS Regular Assessment (Raised by IT Dept.).

13. Select Deductee from the list of a particular Company (Deductor)
In order to ensure that the Deductees listed out is only for the selected Company (Deductor), one needs to check the box displaying, “Show only company filtered list while selecting ‘Deductees’ in the ‘Deductee Details’”.

14.Enter NIL tax deduction without updating ‘Remark’
In order to ensure that the system allows NIL tax deduction for some Deductees without updating ‘Remarks’, one needs to check the box displaying, “Allow ‘Deductee’ entries with zero tax deduction without specifying the allowed exception(i.e. Remarks as ‘Normal’)”.

15. Load Section Automatically
In order to ensure Section will load automatically based on the past entry of the PAN one needs to tick the box “Enable load section automatically based on the past entry of the PAN” .

16.Disable the access of Deductee List from Correction Returns
By default the system allows to access the Deductee List from Correction Returns. In order to disable the Deductee List from Correction Returns, one needs to un-check the box displaying, “Show Deductees from Master in the Deductee list of Correction Return”.

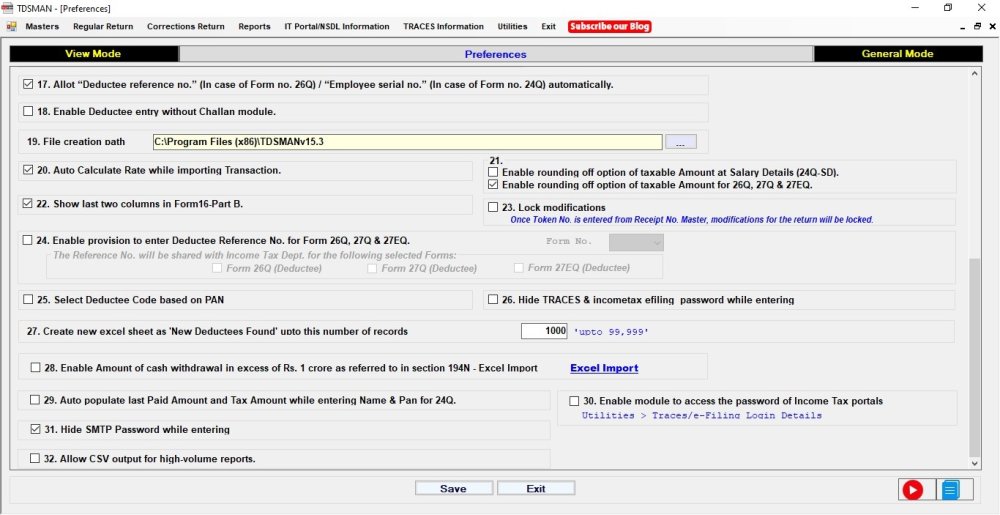
17.Automatic allotment of ‘Employee Serial No.’ for missing PANs
By default the system automatically allots the ‘Employee Serial No.’ for missing PAN. To ensure that it is not done automatically, one needs to un-check the box displaying, “Allot Deductee Reference No. (In case of Form no.26Q) / Employee Serial No.(in case of Form no. 24Q) automatically”.

18.Enter the Deductee Records first and then, later attach with Challan when it is paid
In order to first enter the Deductee records and later attach the Challan when it is paid, one needs to check the box displaying “Enable Deductee entry without Challan module”.

19.Change the default folder where the FVU and other files are being stored
In order to change the default folder path where the FVU and other files are being saved, one needs to change the path against ‘File creation path’

20.Remove the auto-calculation of tax deduction Rate, while importing data from Excel
By default, while importing data from Excel, for each deductee record, based on the ‘Amount Paid’ and the ‘Tax Deduction’, the Rate is automatically re-calculated. In order to avoid this, one needs to un-check the box displaying “Auto Calculate Rate while importing Transaction”.

21.Rounding off the taxable amount as per the IT system
In order to ensure that the taxable amount of the salary details are rounded off as per the IT system, one needs to check the box displaying “Enabling rounding off option of the taxable amount at Salary Details”. In order to ensure that the taxable amount of Form 26Q,27Q,27EQ are rounded off as per the IT system, one needs to check the box displaying “Enabling rounding off option of the taxable amount for 26Q,27Q,27EQ ”.

22.In Form 16 Part B, print the additional information on ‘Total Tax Deducted’ and ‘Shortfall / Excess’
In order to print additional information on ‘Total Tax Deducted’ and ‘Shortfall/ Excess’, one needs to check the box displaying ‘Show last 2 columns in Form 16-Part B’.

23.Ensure that the data is not modified once Returns are filed
In order to ensure that the data is not modified once the Returns are filed, one needs to check the box displaying ‘Lock Modification’.

24.Define one’s own ‘Reference Number’ for Deductees and submit In the Return for Form 26Q, 27Q,27EQ so that it is printed in the TDS Certificates issued by the Department
In order to ensure that one define its own ‘Reference Number’ for Deductees and submit in the Returns, check the box displaying ,”Enable provision to enter Deductee Reference No. for Form 26Q & 27Q”. This gets reflected in the TDS Certificate as issued by the Department.

25.The ‘Deductee Code’ i.e. Company type or Non-Company for every Deductee Record should come automatically from the PAN
In order to ensure that the Deductee Code’ i.e. Company type or Non-Company for every Deductee Record comes automatically from the PAN, one needs to check the box displaying, “Select Deductee Code based on PAN”.

26. Hide Traces & Incometaxindiaefilling Password while Entering
In order to ensure that the Password given for Traces and Incometaxindiaefilling while login if anyone wants to hide the password while entering he needs to check the box displaying, “Hide Traces & Incometaxindiaefilling Password while Entering”.

27. Create New Excel Sheet as ‘New Deductees found’ upto this Number of Records
In order to Create a new excel sheet contains ‘New deductees found’ while importing any excel in the Software one can select the number of records he wants to (max. upto 99,999) , one needs to set the number in the box “Create New Excel Sheet as ‘New Deductees found’ upto this Number of Records”.

28. Enable Amount of Cash withdrawal in Excess of Rs. 1 Crore as referred to in section 194N – Excel Import
In order to enable the excel import option as referred to in section 194N that amount of cash withdrawal in excess Rs. 1 Crore , one needs to tick the box “Enable Amount of Cash withdrawal in Excess of Rs. 1 Crore as referred to in section 194N – Excel Import”.

29. Auto populate last paid Amount and Tax Amount while entering Name and PAN for 24Q
Usually ‘Salary Paid’ to employees remains the same each month. By checking on this option, while working on 24Q (Salary TDS Returns), by default the ‘Salary’ as entered in the previous month will be placed. One can alter this default value. This enables faster data entry.

30. Enable module to access the password of Income Tax portals
In order to access the password of Income Tax portals one can enable this module .

31. Hide SMTP Password while entering
In the creation of the emailing system for TDS / TCS certificates, the SMTP password needs to be provided. By default this password is visible when setting up the emailing credentials. By checking here, the SMTP password will be masked.

32. Allow CSV output for high-volume reports
If you want to export high-volume reports ,you can enable this option to get the reports

Once this is completed, click on Save and Exit.
Need more help with this?
TDSMAN - Support